Automating Notification and alerts in JIRA is a simple process that can save time and reduce the risk of missing important updates. JIRA automation can be used to automatically send notifications and alerts to team members when specific events occur. At the core of Jira’s notification system are events, notification schemes, and recipients.
- Events represent things that happen in an issue’s lifecycle, such as Issue Created, Issue Updated, Work Logged On Issue, Issue Transitioned, Comment Added, and project‑specific custom events.
- Notification schemes map those events to recipients: who should be informed when each event occurs.
- Recipients can be single users, groups, project roles, the current assignee, the reporter, or users referenced in custom fields (for example “Approver”).
When an event fires in a project that has an associated notification scheme, Jira evaluates the scheme and sends notifications—most commonly via email, but also through in‑app notifications and integrations—to the configured recipients.
Automation rules can:
- Fire on complex triggers: specific field changes, SLA breaches, scheduled times, or JQL‑matching events.
- Apply conditions so only high‑value events send alerts (for example, only for Priority = Highest or when status changes to “Blocked”).
- Send alerts to multiple channels: email, Slack, Microsoft Teams, webhooks, or even create follow‑up issues.
Types of JIRA notification
Jira can generate several kinds of notifications, which often work together:
- Email notifications from notification schemes – event‑driven messages when particular issue changes happen.
- Batched email notifications – summary emails grouping multiple updates over a time window, available on newer Jira versions to reduce noise.
- Filter subscription emails – scheduled digests of issues that match a saved filter, such as “Open critical bugs in project X every morning.”
- Automation rule notifications – custom emails, Slack/Teams messages, or webhooks triggered by Automation for Jira rules.
To automate notifications and alerts in JIRA, you can use JIRA’s built-in notification and alert features, as well as third-party add-ons and plugins. Here are some ways to automate notifications and alerts in JIRA:
- JIRA’s built-in notification schemes allow you to customize who receives notifications and when. You can set up notifications to be sent to specific users or groups based on the event that triggered the notification. For example, you can set up notifications to be sent to developers when a bug is assigned to them or to a project manager when a project is completed.
- JIRA also allows you to set up email notifications for certain events, such as issue creation or updates. You can customize the email template and content to include specific information about the event.
- Third-party add-ons and plugins can enhance JIRA’s notification and alert features. For example, the Automation for JIRA add-on allows you to create rules that trigger notifications and alerts based on certain conditions, such as the status of an issue or the assignment of an issue to a specific user. The JIRA Misc Workflow Extensions add-on also allows you to send email notifications based on certain workflow events.
- You can also use JIRA’s REST API to automate notifications and alerts. For example, you can write a script that sends an email notification to a specific user when a new issue is created, or that sends an alert to a Slack channel when a critical issue is assigned to a developer.
Here are some examples of how to send notifications and alerts in JIRA:
- Configure notifications: To configure notifications in JIRA, go to the Administration panel and select “System.” Then, select “Notifications” and choose the event you want to receive notifications for, such as “Issue created” or “Issue updated.” You can then select the users or groups you want to receive notifications and customize the notification message. For example, you can choose to send an email notification to a specific user whenever an issue is updated.
- Create a custom event: To create a custom event in JIRA, go to the Administration panel and select “Issues.” Then, select “Events” and click “Add event.” You can then define the event and specify the conditions that will trigger the event. For example, you can create an event that triggers a notification whenever a certain field is updated in an issue.
- Use JIRA Automation: JIRA Automation allows you to automate tasks and send notifications based on certain events. For example, you can create a rule that triggers a notification whenever a new issue is created in a certain project. You can also use JIRA Automation to automate other tasks, such as issue transitions and assignments.
- Add a comment: When you add a comment to an issue in JIRA, you can choose to notify specific users or groups about the comment. For example, you can notify the project manager or a specific team member when you add a comment to an issue that is relevant to them.
- Use add-ons: JIRA has a number of add-ons and plugins that can be used to send notifications and alerts. For example, the “Slack for JIRA” add-on allows you to send notifications to a Slack channel whenever an issue is updated or assigned.
Here are some examples of how notifications and alerts work in JIRA:
- Issue updates: When a user creates a new issue in JIRA, they can choose to receive notifications whenever the issue is updated. For example, if a developer makes changes to the issue’s description or status, JIRA can send an email notification to the user who created the issue to let them know about the update.
- Commenting: When a user comments on an issue, they can choose to “watch” the issue, which means they will receive notifications whenever a new comment is added. This allows users to stay up-to-date on ongoing discussions and provide feedback in a timely manner.
- Assignments: When an issue is assigned to a user or group, JIRA can send a notification to let them know. For example, if a manager assigns a bug report to a developer, JIRA can send an email notification to the developer to inform them of the new assignment.
- Due dates: JIRA can send notifications when an issue is approaching its due date or when it is overdue. For example, if a task is due in two days and has not yet been completed, JIRA can send a reminder email to the assigned user to ensure that the task is completed on time.
- Custom events: JIRA allows users to create custom events that trigger notifications or alerts. For example, if a user creates a custom field called “priority level,” they can set up a notification to be sent whenever the priority level of an issue is changed. This helps to ensure that important changes are communicated to the right people in a timely manner.
Here’s how to automate notifications and alerts in JIRA with an example:
- Navigate to the “Project Settings” page for the JIRA project you want to configure.
- Select “Automation” from the left-hand menu and click “Create rule.”
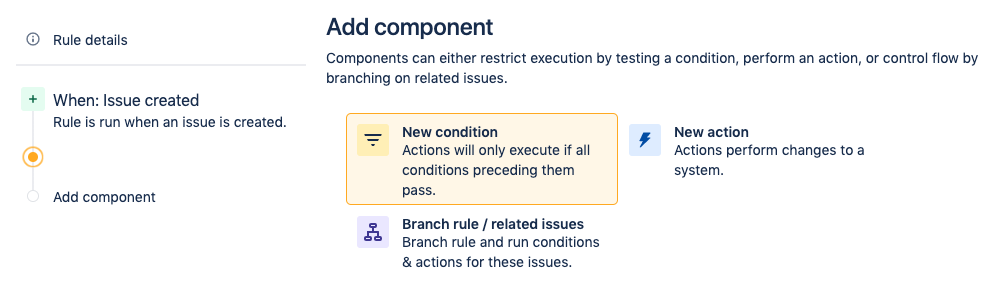
- Choose the trigger for the automation. For example, you may want to send a notification when a new issue is created or when an issue is transitioned to a specific status.
- Define the conditions that must be met for the notification to be triggered. For example, you may only want to send a notification when a high-priority issue is created.
- Choose the action you want to take. In this case, you want to send a notification. Select “Send email” as the action.
- Fill in the email template with the appropriate information. You can customize the subject line and body of the email to include relevant details such as the issue key, summary, and description.
- Set up the recipient list. You can choose to send notifications to specific users, groups, or roles.
- Save the automation rule.
Here’s an example of how to automate notifications and alerts in JIRA: Let’s say you have a software development project in JIRA and you want to receive a notification when a new bug is created. Here’s how you can set up automation to send an email notification to your team:
- Navigate to the “Project Settings” page for your JIRA project.
- Select “Automation” from the left-hand menu and click “Create rule.”
- Choose “Issue created” as the trigger.
- Define the condition for the notification. In this case, you want to receive a notification only when a new bug is created. Set the condition to “Issue type” equals “Bug.”
- Choose “Send email” as the action.
- Fill in the email template with the appropriate information. For example, the email body can include the issue key, summary, and description.
- Set up the recipient list. You can choose to send the email notification to specific users, groups, or roles.
- Save the automation rule.
Now, when a new bug is created in your JIRA project, you will receive an email notification with the details of the issue. This can help you stay on top of new bugs and take action quickly to resolve them.
You can create a filter that includes all issues in the project and set up a subscription for the filter with the assignee as the email recipient. Here’s how to do it:
- Go to your JIRA project and navigate to the “Issues” section.
- Click on “Advanced issue search” and create a filter that includes all issues in the project. For example, you can create a filter that includes all issues with a due date field set.
- Once you have created the filter, save it and click on the “Details” button next to the filter.
- In the filter details page, click on the “Subscribe” button in the top right-hand corner of the screen.
- In the subscription window, select the frequency of notifications and the email format.
- Under the “Email Format” section, select the “HTML” option and click on the “More Options” button.
- In the “More Options” window, select the “Issue Fields” tab and check the box next to “Due Date.”
- Click on the “Add Recipients” button and select the “Current Assignee” option.
- Click “Save” to save the subscription.
To set due date notifications in JIRA, follow these steps:
- Go to your JIRA project and open the issue for which you want to set a due date.
- Click on the “Due Date” field and select the date by which the issue needs to be resolved.
- Once you have set the due date, click on the “More” button in the top right-hand corner of the screen and select “Notifications.”
- In the “Notifications” window, you will see a checkbox labeled “Send email reminders to watchers.” Check this box to ensure that watchers of the issue receive email notifications when the due date is approaching or has passed.
- Under the checkbox, you will see options to specify when the email reminders should be sent. By default, JIRA sends email reminders one day before the due date and again when the due date has passed. However, you can customize these options to meet your specific needs.
- Once you have configured the notifications, click “Save” to save the changes.
Conclusion
Jira’s built‑in notification schemes, personal settings, filter subscriptions, and Automation for Jira features together provide a flexible toolkit for automating alerts. When teams start from a clear notification strategy, configure schemes per role, and use automation and subscriptions for targeted, high‑value alerts, they can keep everyone informed without overwhelming their inboxes or chat channels.
Recommended Reading
- JIRA Dashboard – Popular Gadgets for Agile Teams
- Maximizing productivity with JIRA – Tips and Tricks
- JIRA Backlog Refinement – Tips and Tricks
- JIRA Reports used in tracking Agile Projects
- JIRA Structure – Create & Manage Epics and Stories
- JQL functions – Advanced searching in JIRA
- Scrum Board – Tips and Tricks for JIRA
- JQL functions – Advanced searching in JIRA