Automatically assign issues – JIRA Automation on Issue Assignment is a powerful feature that allows teams to assign issues to specific team members or groups based on certain criteria. You can create a Jira automation rule by using an if/else condition, which automatically assigns issues to groups of users based on their issue types. Here are some examples of how you can use JIRA automation to automate issue assignments:
Automatically Assign Issues – Issue Type
You can set up an automation rule to automatically assign issues of a certain type to a specific team member. Example: Let’s assume that you have a scrum team that consists of front-end and back-end developers. You want to automate issue assignments based on issue type so that all front-end related issues are assigned to the front-end developer and all back-end related issues are assigned to the back-end developer.

- First, navigate to the JIRA Administration page and select “Automation” from the left-hand sidebar.
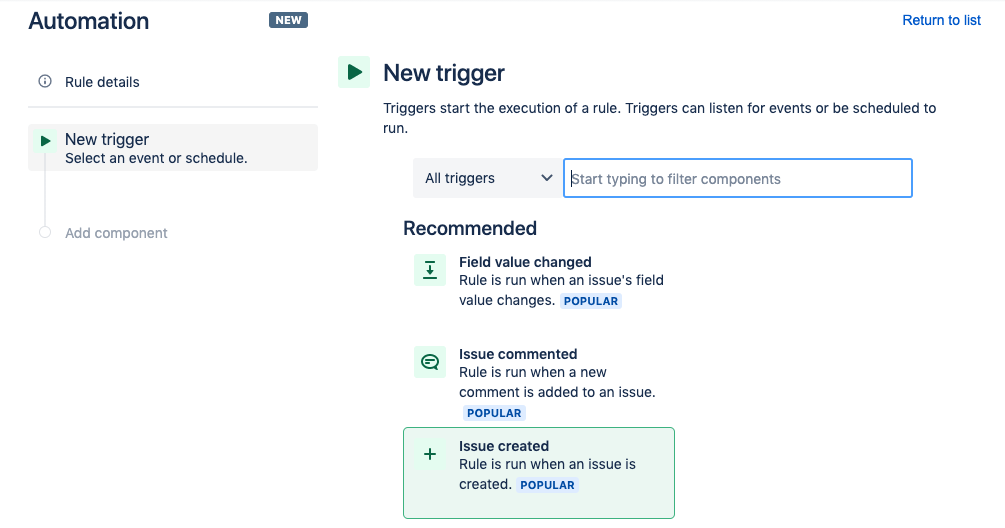
- Next, click the “Create Rule” button to create a new automation rule.
- Give your new rule a name and select “Issue Created” as the trigger event.
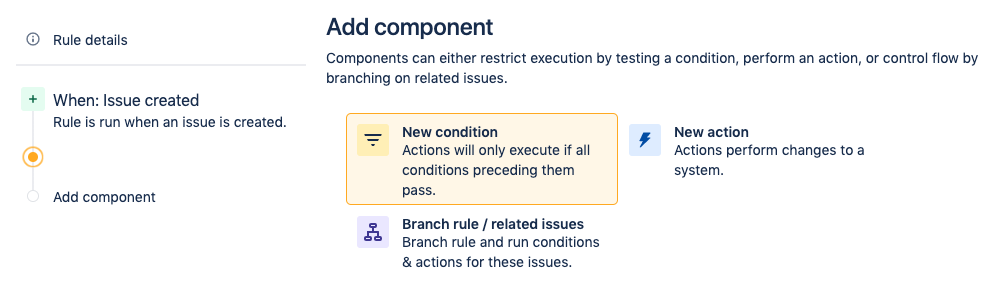
- Under the “IF” section, select “Issue Matches JQL” and enter the JQL query that will match all front-end-related issues. For example, you can use the following JQL query: issueType = Front-End.
- Under the “THEN” section, select “Assign Issue” and specify the front-end developer as the assignee.
- Click “Save” to save your new automation rule.
- Now, when a new issue of type “Front-End” is created, it will be automatically assigned to the front-end developer. You can create a similar automation rule for back-end-related issues by using the appropriate JQL query and assigning the back-end developer as the assignee.
- By automating issue assignments based on issue type, you can ensure that issues are assigned to the appropriate team members or groups, improve the efficiency of your workflow, and reduce the time required to manually assign issues.
Now, when a new issue of type “Front-End” is created, it will be automatically assigned to the front-end developer. You can create a similar automation rule for backend-related issues by using the appropriate JQL query and assigning the back-end developer as the assignee.
Automatically Assign Issues – Priority
You can set up an automation rule to automatically assign high-priority issues to specific team members who are responsible for handling urgent issues. Example: Let’s assume that you have a support team that handles customer support requests. You want to automate issue assignments based on priority so that all high-priority issues are assigned to the team lead, while medium-priority issues are assigned to the most experienced support representative, and low-priority issues are assigned to a junior support representative.
- First, navigate to the JIRA Administration page and select “Automation” from the left-hand sidebar.
- Next, click the “Create Rule” button to create a new automation rule.
- Give your new rule a name and select “Issue Created” as the trigger event.
- Under the “IF” section, select “Issue Matches JQL” and enter the JQL query that will match all high-priority issues. For example, you can use the following JQL query: priority = High.
- Under the “THEN” section, select “Assign Issue” and specify the team leads as the assignee.
- Click “Save” to save your new automation rule.
- Now, create a new automation rule for medium-priority issues. Under the “IF” section, select “Issue Matches JQL” and enter the JQL query that will match all medium-priority issues. For example, you can use the following JQL query: priority = Medium.
- Under the “THEN” section, select “Assign Issue” and specify the most experienced support representative as the assignee.
- Click “Save” to save your new automation rule.
- Finally, create a new automation rule for low-priority issues. Under the “IF” section, select “Issue Matches JQL” and enter the JQL query that will match all low-priority issues. For example, you can use the following JQL query: priority = Low.
- Under the “THEN” section, select “Assign Issue” and specify the junior support representative as the assignee.
- Click “Save” to save your new automation rule.
Now, when a new issue is created with a specific priority, it will be automatically assigned to the appropriate support representative based on priority. By automating issue assignments based on priority, you can ensure that high-priority issues are handled by experienced team members, while junior team members handle low-priority issues. This can improve the efficiency of your support team and reduce the time required to manually assign issues.
Automatically Assign Issues – Component
You can set up an automation rule to automatically assign issues related to a specific component to a team member who is responsible for that component. Example: Let’s assume that you have a development team that works on multiple components of a software project, such as front-end, back-end, and database. You want to automate issue assignments based on components so that all front-end-related issues are assigned to the front-end developer, all back-end-related issues are assigned to the back-end developer, and all database-related issues are assigned to the database developer.
- First, navigate to the JIRA Administration page and select “Automation” from the left-hand sidebar.
- Next, click the “Create Rule” button to create a new automation rule.
- Give your new rule a name and select “Issue Created” as the trigger event.
- Under the “IF” section, select “Issue Matches JQL” and enter the JQL query that will match all front-end-related issues. For example, you can use the following JQL query: component = Front-End.
- Under the “THEN” section, select “Assign Issue” and specify the front-end developer as the assignee.
- Click “Save” to save your new automation rule.
- Now, create a new automation rule for back-end-related issues. Under the “IF” section, select “Issue Matches JQL” and enter the JQL query that will match all back-end related issues. For example, you can use the following JQL query: component = Back-End.
- Under the “THEN” section, select “Assign Issue” and specify the back-end developer as the assignee.
- Click “Save” to save your new automation rule.
- Finally, create a new automation rule for database-related issues. Under the “IF” section, select “Issue Matches JQL” and enter the JQL query that will match all database-related issues. For example, you can use the following JQL query: component = Database.
- Under the “THEN” section, select “Assign Issue” and specify the database developer as the assignee.
- Click “Save” to save your new automation rule.
Now, when a new issue is created with a specific component, it will be automatically assigned to the appropriate developer based on the component. By automating issue assignments based on components, you can ensure that issues are assigned to the appropriate team members or groups, improve the efficiency of your workflow, and reduce the time required to manually assign issues.
Automatically Assign Issues – Custom Fields
You can set up an automation rule to automatically assign issues based on custom fields such as customer, product version, or region. Example: Let’s assume that you have a custom field in JIRA called “Department” that contains the name of the department responsible for the issue. You want to automate issue assignments based on this custom field so that all issues related to a specific department are automatically assigned to the appropriate developer.
- First, navigate to the JIRA Administration page and select “Automation” from the left-hand sidebar.
- Next, click the “Create Rule” button to create a new automation rule.
- Give your new rule a name and select “Issue Created” as the trigger event.
- Under the “IF” section, select “Issue Matches JQL” and enter the JQL query that will match all issues related to a specific department. For example, you can use the following JQL query: department = “IT”.
- Under the “THEN” section, select “Assign Issue” and specify the appropriate developer as the assignee.
- Click “Save” to save your new automation rule.
- Now, create a new automation rule for each department you want to automate issue assignments for.
- Under the “IF” section, select “Issue Matches JQL” and enter the JQL query that will match all issues related to the specific department. For example, you can use the following JQL query: department = “Marketing”.
- Under the “THEN” section, select “Assign Issue” and specify the appropriate developer as the assignee.
- Click “Save” to save your new automation rule.
Now, when a new issue is created with a specific department, it will be automatically assigned to the appropriate developer based on the custom field. By automating issue assignments based on custom fields, you can ensure that issues are assigned to the appropriate team members or groups, improve the efficiency of your workflow, and reduce the time required to manually assign issues. This can be especially useful for organizations that have complex structures or multiple teams working on different projects.
Automatically Assign Issues – Round Robin
You can set up an automation rule to automatically assign issues in a round-robin fashion among team members. For example, all incoming issues can be assigned to team members in a cyclic order. Example: Let’s assume you have a team of developers and you want to automate the assignment of issues to each developer in a round-robin fashion to distribute the workload evenly.
- First, navigate to the JIRA Administration page and select “Automation” from the left-hand sidebar.
- Next, click on the “Create Rule” button to create a new automation rule.
- Give your new rule a name and select “Issue Created” as the trigger event.
- Under the “IF” section, select “Issue Matches JQL” and enter a JQL query that matches all issues that need to be assigned to the team. For example, you can use the following JQL query: project = “My Project” AND status = “To Do”.
- Under the “THEN” section, select “Round-robin Assign” and select the group or list of developers you want to assign issues to.
- Set the “Ordering” option to “Random” to ensure that the round-robin assignment is fair and doesn’t favor any one developer.
- Click “Save” to save your new automation rule.
Now, when a new issue is created that matches the JQL query, it will be automatically assigned to the next developer in the round-robin rotation. The round-robin assignment ensures that each developer gets an equal number of issues to work on and can help prevent one developer from getting overloaded with too many issues.
Additionally, you can customize the round-robin assignment to include specific criteria, such as only assigning issues to developers with specific skills or expertise, or excluding developers who are on vacation or out of the office. This can be done by setting up more complex JQL queries or using additional automation rules to filter the assignment criteria.
Automatically Assign Issues – Issue Creator
You can set up an automation rule to automatically assign issues to the team member who created the issue. Example: Let’s assume you have a team of support agents who handle customer issues, and you want to automatically assign each issue to the support agent who created the issue.
- First, navigate to the JIRA Administration page and select “Automation” from the left-hand sidebar.
- Next, click the “Create Rule” button to create a new automation rule.
- Give your new rule a name and select “Issue Created” as the trigger event.
- Under the “IF” section, select “Issue Matches JQL” and enter a JQL query that matches all issues that need to be assigned to the support agents. For example, you can use the following JQL query: project = “Customer Support” AND status = “Open”.
- Under the “THEN” section, select “Assign to Issue Creator” to assign the issue to the user who created it.
- Click “Save” to save your new automation rule.
Now, when a new issue is created that matches the JQL query, it will be automatically assigned to the support agent who created it. This can help improve communication and collaboration within the support team and ensure that each support agent is responsible for the issues they create.
Additionally, you can customize the automatic assignment based on the issue creator to include specific criteria, such as only assigning issues to support agents who are currently available or excluding support agents who are out of the office. This can be done by setting up more complex JQL queries or using additional automation rules to filter the assignment criteria.
Automatically Assign Issues – Issue Status
You can set up an automation rule to automatically assign issues to a specific team member when they are transitioned to a certain status. Example: Let’s assume you have a team of developers who work on a software project, and you want to automatically assign issues to specific developers based on the current status of the issue.
- First, navigate to the JIRA Administration page and select “Automation” from the left-hand sidebar.
- Next, click the “Create Rule” button to create a new automation rule.
- Give your new rule a name and select “Issue Updated” as the trigger event.
- Under the “IF” section, select “Issue Matches JQL” and enter a JQL query that matches all issues that need to be assigned based on their status. For example, you can use the following JQL query: project = “My Project” AND status = “In Progress”.
- Under the “THEN” section, select “Assign to User” and select the developer who should be assigned the issue based on its status. For example, you can assign all issues with the status “In Progress” to a senior developer with more experience.
- Click “Save” to save your new automation rule.
Now, when an issue is updated with a status that matches the JQL query, it will be automatically assigned to the developer who should handle it based on their expertise and experience. This can help ensure that each issue is handled by the most appropriate developer and can improve the quality of work and productivity of the team.
Additionally, you can customize the automatic assignment based on the issue status to include specific criteria, such as only assigning issues to developers who are currently available or excluding developers who are working on other high-priority issues. This can be done by setting up more complex JQL queries or using additional automation rules to filter the assignment criteria.
Automatically Assign Issues – Load balancing
Assigns issues based on team member workload, ensuring that each team member has a roughly equal number of issues assigned to them. Example: Let’s say you have a team of five developers who are responsible for handling incoming issues in JIRA. You want to ensure that each team member has roughly the same workload and that issues are assigned based on the current workload of each team member.
- To set up automatic assignments based on load balancing, you can create a JIRA workflow rule that automatically assigns issues to the team member with the lightest workload.
- Here’s how you can do it:
- Navigate to the JIRA Administration menu and select “Issues” > “Workflow.”
- Click on the workflow that you want to modify and select “Edit” to open the workflow editor.
- Click on the transition that you want to add the automatic assignment to and select “Post Functions.”
- Click on “Add post function” and select “Assign to Lead.”
- In the “Assign to Lead” dialog box, select “Use load balancing” as the assignment method.
- Select the relevant project and issue types that you want the automatic assignment to apply to.
- Choose the “Group” or “User” that you want the issues to be assigned to. In this case, we will choose “User.”
- Select the “Field” that you want to use for load balancing. You can choose from “Original Estimate,” “Story Points,” “Time Spent,” and “Unestimated Time.”
- Choose the “Ordering Method” that you want to use for load balancing. You can choose from “Ascending” or “Descending.”
- Click “Add” to save the post function.
Once you’ve set up the load balancing rule, JIRA will automatically assign new issues to the team member with the lightest workload, based on the load balancing criteria that you specified. This helps to ensure that each team member has roughly the same workload and that issues are assigned based on the current workload, rather than being assigned arbitrarily or based on other criteria.
Automatically Assign Issues – Availability
Assigns issues to team members who are currently available and not working on other high-priority tasks, ensuring that issues are handled promptly. Example: Let’s say you have a team of developers who work in different time zones, and you want to ensure that issues are assigned to team members who are currently available to work on them.
To set up automatic assignments based on availability, you can create a JIRA workflow rule that automatically assigns issues to the team member who is currently available and has the relevant skills to handle the issue.
Here’s how you can do it:
- Navigate to the JIRA Administration menu and select “Issues” > “Workflow.”
- Click on the workflow that you want to modify and select “Edit” to open the workflow editor.
- Click on the transition that you want to add the automatic assignment to and select “Post Functions.”
- Click on “Add post function” and select “Assign to Lead.”
- In the “Assign to Lead” dialog box, select “Use availability” as the assignment method.
- Select the relevant project and issue types that you want the automatic assignment to apply to.
- Choose the “Group” or “User” that you want the issues to be assigned to. In this case, we will choose “User.”
- Select the “Field” that you want to use to determine availability. You can choose from “Calendar,” “Time Zone,” “Availability,” or “Schedule.”
- Choose the “Availability Calculation” that you want to use. This will depend on the specific method that you have chosen for determining availability.
- Click “Add” to save the post function.
Once you’ve set up the availability rule, JIRA will automatically assign new issues to the team member who is currently available and has the relevant skills to handle the issue. This helps to ensure that issues are assigned to team members who can work on them immediately, and who are available to handle them within the specified time frame.
Automatically Assign Issues – Skills
Assigns issues based on team member skills, ensuring that issues are assigned to the team member with the most appropriate skills and expertise. Example: Let’s say you have a team of developers with different skill sets, and you want to ensure that issues are assigned to team members who have the relevant skills to handle them.
To set up automatic assignments based on skill, you can create a JIRA workflow rule that automatically assigns issues to the team member who has the relevant skills to handle the issue.
Here’s how you can do it:
- Navigate to the JIRA Administration menu and select “Issues” > “Workflow.”
- Click on the workflow that you want to modify and select “Edit” to open the workflow editor.
- Click on the transition that you want to add the automatic assignment to and select “Post Functions.”
- Click on “Add post function” and select “Assign to Lead.”
- In the “Assign to Lead” dialog box, select “Use skill” as the assignment method.
- Select the relevant project and issue types that you want the automatic assignment to apply to.
- Choose the “Group” or “User” that you want the issues to be assigned to. In this case, we will choose “User.”
- Select the “Field” that you want to use to determine skill. You can choose from “Skill” or “Skill Level.”
- Choose the “Skill” or “Skill Level” that you want to use to determine the assignment.
- Click “Add” to save the post function.
Once you’ve set up the skill-based rule, JIRA will automatically assign new issues to the team member who has the relevant skills to handle the issue. This helps to ensure that issues are assigned to team members who can handle them effectively and efficiently, without wasting time on tasks that are outside their skill set.
Summary
JIRA automation on Issue Assignment saves time and ensures that issues are assigned to the right team members or groups in a timely and efficient manner. By automating issue assignments, teams can avoid manual errors, reduce the time required to assign issues and improve the overall efficiency of their workflow.
Recommended Reading
- JIRA Dashboard – Popular Gadgets for Agile Teams
- Maximizing productivity with JIRA – Tips and Tricks
- JIRA Backlog Refinement – Tips and Tricks
- JIRA Reports used in tracking Agile Projects
- JIRA Structure – Create & Manage Epics and Stories
- JQL functions – Advanced searching in JIRA
- Scrum Board – Tips and Tricks for JIRA
- JQL functions – Advanced searching in JIRA