You can create Jira Bulk Issue using a comma separated by value file (CSV). JIRA Bulk Issue import using CSV template is one of the key features of JIRA. This feature can be very useful when you have a large number of issues to create or when you need to import issues from an external source. The CSV files are text files that represent tabulated data and separate different sections by commas. For import, you must find the mandatory fields defined in the JIRA setup as we need to include these in the template. These fields can be easily identified by an asterisk beside those fields.
Prepare the CSV File for JIRA Bulk Issue
Each CSV file must possess a heading row with a Summary column. The first row must be the heading row and represents the fields of the create issue page. Example − Issue ID, Issue Type, Issue Priority, Summary, Description, Acceptance Criteria, Labels, Story Points, Components, etc. The summary column will contain the summary of the task or ticket e.g. FDD Review, LOE, etc. Attached is a spreadsheet for your reference, you can adjust fields as per your JIRA setup.
- Use double-quote marks (“) in your CSV file to capture data that spans multiple lines. e.g. upon import, JIRA will treat the following CSV as a single record: Summary, Description, Status, “Login issue”, “This is on a new line”, Open
- While importing issues from a CSV file, the Project Name and Project Key are important columns in CSV. In addition, the name of these fields should match exactly as they are present in JIRA.
- You can import multiple values into a Jira field that accepts multiple values (e.g. Fix (for) Version, Affects Version, Component, Labels). To do this, your CSV file must specify the same column name for each value you wish to aggregate into the mapped Jira field. The number of column names specified must match the maximum number of values to be aggregated into the mapped field.
- You can attach files to issues created from your CSV file. To do this, specify the URL of your attachment in an ‘Attachments’ column within your CSV file.
Creating sub-tasks
-
- You can create sub-tasks of issues through a CSV file import, by encapsulating this structure in your CSV file. To do this:
- Your CSV file requires two additional columns whose headings should be named similarly to Issue Id and Parent Id.
- Ensure each regular (non sub-task) issue is given a unique (sequential) number in the Issue Id column. Do not include any value in the Parent Id fields for regular issues.
- To create a sub-task of a regular issue in your CSV file, reference the unique Issue Id number of the regular issue in the Parent Id column. Do not include any value in the Issue Id fields for sub-tasks.
Importing issues into multiple Jira projects
-
- You can import issues from your CSV file into different Jira projects through a CSV file import. To do this:
- Your CSV file requires two additional columns whose headings should be named similarly to Project Name and Project Key.
- Ensure that every issue represented in your CSV file contains the appropriate name and key in these columns for the Jira projects to which they will be imported.
Import CSV File for JIRA Bulk Issue
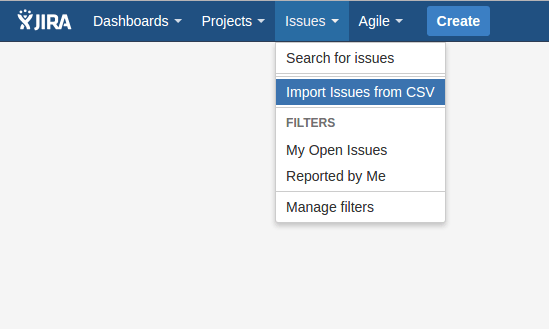
Step 1 − Select “Issues” from the top of JIRA. “Import Issues from CSV” to open the Bulk Create Setup page.
Step 2 − On the Setup page, select CSV Source File. Do not check the “Use an existing configuration file” check box, if you do not have a configuration file or if you want to create a new configuration file.
Configuration files specify a mapping between column names in the CSV file’s header row and fields in the JIRA application.
Step 3 − If the user checks the checkbox of “Use an existing configuration file”, JIRA will ask to specify an Existing Configuration File.
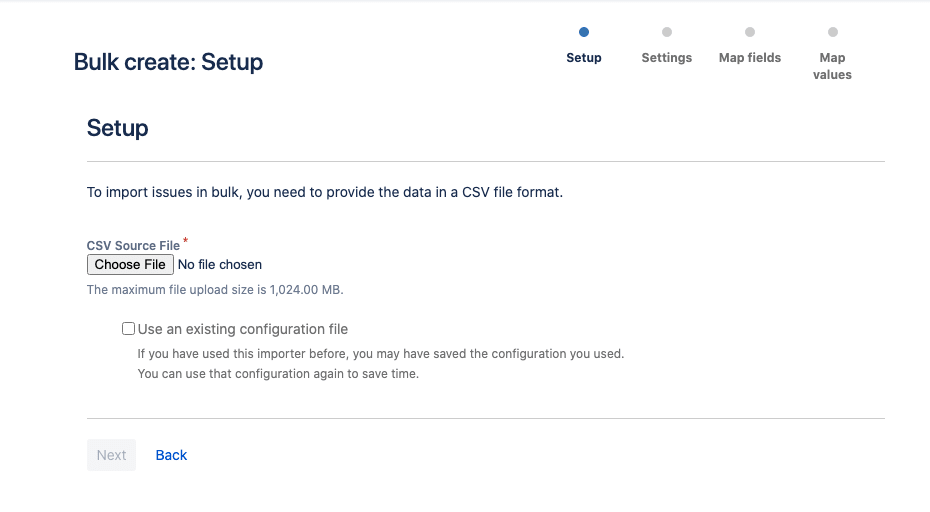
Step 4 − If the user does not select this option, then at the end of the CSV file import wizard, JIRA will ask to create a configuration file, which can be used for subsequent CSV imports.
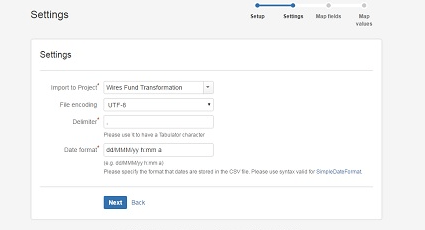
Click on the Next button → the Settings step of the CSV file import wizard will display. Complete the required fields. If the CSV file uses a different separator character other than a comma, specify that character in the CSV Delimiter field. If the separator is a ‘Tab’, this can be entered using the format ‘/t’.
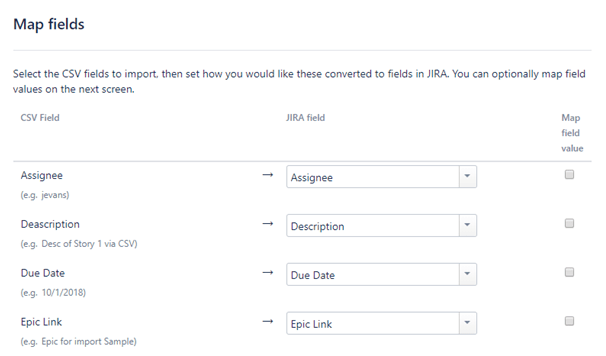
Step 5 − Click on the Next button to proceed to the Map field’s step of the CSV file import wizard. Here, the user has to map the column headers of the CSV file to the fields in the selected JIRA project. After selection, tick the check box for the Map field value.
A CSV field should map to the JIRA summary field. This ensures the issues created have a summary.
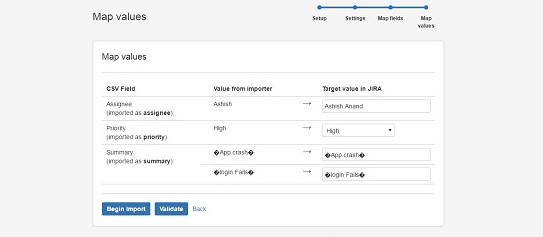
Step 6 − Click on the Next button, and the Map values step of the CSV file import wizard will display. On this step of the import wizard, the user can select which specific CSV field values to map to which specific JIRA field value.
Fields whose Map Field Value checkboxes were selected in the previous step will be presented on this page.
If the CSV field has a username (e.g. Reporter or Assignee) and does not select the Map Field Value check box for this field in the previous step of the CSV file import wizard, then the importer will map imported usernames from the CSV file to (lowercase) JIRA usernames.
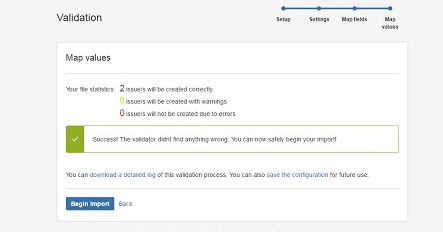
Step 7 − Click on the Validate button, it will validate the imported data and display if any errors or warnings are required, otherwise, it will display how many successful imports are possible with the file.
Step 8 − Now, Click the Begin Import button. The importer will display updates like import is in progress, then a success message when the import is completed.
Step 9 − Click on the Check Created issues, it will display the list of issues that are created using the CSV.
Tips for JIRA Bulk Issue Import
- Understand the required fields: Before you start creating your CSV template, make sure you understand the required fields for each issue type in JIRA. Some fields are mandatory and must be included in your CSV file, while others may be optional. Check the JIRA documentation to ensure that you include all required fields in your template.
- Use a text editor or spreadsheet software: When filling in your CSV template, it’s best to use a text editor or spreadsheet software, such as Microsoft Excel or Google Sheets. This will make it easier to edit and manage your data and will help ensure that your CSV file is properly formatted. f you’re using Microsoft Excel to create your CSV template, you can use formulas to populate data automatically. For example, you can use a formula to automatically populate the “Due Date” field based on the “Start Date” field.
- Check the formatting: JIRA requires specific formatting for CSV files. Make sure that your file is formatted correctly, with each row representing a single issue and each column representing a JIRA field. You can check the JIRA documentation for information on the required formatting.
- Test your CSV file: Before importing your CSV file into JIRA, it’s a good idea to test it first. You can do this by importing a small subset of your data and checking that the issues are created correctly. This can help you identify any errors or issues with your CSV file before importing all of your data.
- Use field mapping: When importing your CSV file, use the field mapping feature in JIRA to map the fields in your CSV file to the corresponding fields in JIRA. This will help ensure your data is imported correctly and all fields are filled in as expected.
- Review the preview: Before importing your data, review the preview of the issues that will be created. This will allow you to check that the field mapping is correct and that the issues will be created as expected. If there are any issues, you can go back and edit your CSV file before importing.
Recommended Reading
-
- Scrum Board – Create & Customize for Scrum Team
- Kanban Board – Create & Customize for Kanban Team
- Scrum Board – Tips and Tricks for JIRA
- JQL functions – Advanced searching in JIRA
- JIRA Structure – Create & Manage Epics and Stories
- JIRA Reports use in tracking Agile Projects
- Issue Analysis Reports use in Agile Projects
- Sprint ID for an Active or Closed Sprint
- Text Field search using advanced search in JIRA
JIRA Reference: Click Here