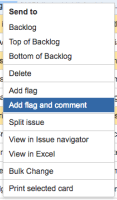
This feature helps “Add a flag and comment” at the same time to the tasks of Scrum Board. The comment section is also automatically updated with the comment provided in the flag. You can also remove the flag and comment. To make it more obvious, flagged issues are displayed in yellow in the backlog and in the active sprint.
- Navigate to your desired board.
- Click either Scrum backlog, Active sprints, Kanban backlog (if enabled), or Kanban board or Scrum Board.
- Click the issue that you want to flag or unflag.
- In the Issue Detail View, select Add flag or Remove flag from the ‘cog’ drop-down. You can also right-click on the issue > Add flag or Remove flag.
Flagged issues in Scrum Board
- The flag for an issue is stored in a custom checkbox field named “Flagged”, which has only one value: Impediment. This means that you can use this JQL query to find flagged issues: Flagged = Impediment or Flagged = EMPTY
- Flagged and Blockers issues can be identified from Sprint Health Gadget.It summarizes the most important metrics in a sprint. I like to have this one in the upper-left so everyone can see who’s working on the sprint and get a quick sense for any trouble in the air.
Sprint Health Gadget for JIRA dashboard

JIRA Agile Sprint Health Gadget displays a color-coded bar graph showing a concise summary of the issues in a specified sprint. The gadget also displays other handy information about the progress of the sprint and participants in the sprint.
| Field | Description |
| Overall sprint progress bar | The blue, yellow, and green colors of this bar represent different issues in different statuses. These colors match the blue, yellow, and green columns in the column configuration for your board, where each column has different statuses mapped to it. Click any part of the bar to view the issues in the corresponding statuses. |
| Time elapsed | The time elapsed since the sprint was started. |
| Work complete | This is calculated based on the estimation statistic used for your board. This is reflected by the green part of the progress bar. For example, if you have 50 story points in a sprint and you have 3 issues with 10 story points that have been resolved, the ‘Work complete’ will be 20% (i.e. 10 out of 50 story points). Note, the Sprint Health gadget will not reflect the progress from work logged in the ‘Remaining Estimate’ and ‘Time Spent’ fields in JIRA, if you have your board configured to use that data. |
| Scope change | Adding or removing an issue from a sprint, after it has started is considered a change of scope. The percentage is calculated using the statistic that is configured for the board (see Configuring Estimation and Tracking). For example, if you started a sprint with 50 story points and add an issue with 5 story points, the Sprint Health gadget would show a 10% scope change. If you add/remove issues that don’t have estimates, the scope change will not be altered. If you’re using Time Tracking, Scope Change will not be shown. |
| Blockers | This field counts all blockers that are in ‘To Do’ or ‘In Progress’ in JIRA Agile. A blocker is evaluated as the highest priority level defined in your JIRA instance. See Defining ‘Priority’ Field Values. |
| Flagged | This field counts all issues that have been flagged. |
Agile Sprint Health gadget in your JIRA dashboard
- Log in to JIRA or navigate to your dashboard.
- Click the Add Gadget link in the top right. The Gadget Directory screen will display.
- Find the JIRA Agile Sprint Health gadget in the list of gadgets and click Add it now.
- Click the Finished button in the bottom right.
- The JIRA Agile Sprint Health Gadget gadget will display on your dashboard. Enter the following setup details for your gadget:
- Board — this will display all boards
- Sprint — this will list all active sprints
- Refresh Interval — choose how often the data in the gadget will refresh.
- Enable all three options underneath so assignees, sprint name, and board name are always visible
- Use the Next Sprint Due (auto) option for Sprint so you don’t have to update the gadget’s settings every sprint
- Click the Save button. The JIRA Agile Sprint Health Gadget will display on your dashboard.
Quick Filters for Scrum Board
Quick Filters allow users to filter displayed data appearing on a Scrum board or Kanban board according to any JQL (Jira Query Language) statement. You should be a JIRA admin or scrum/kanban board admin to apply filters.
Creating Quick filters for Scrum Board
Users can create Quick filters (ad-hoc filters) as needed or create a saved filter that will be always displayed in any BigPicture component window.
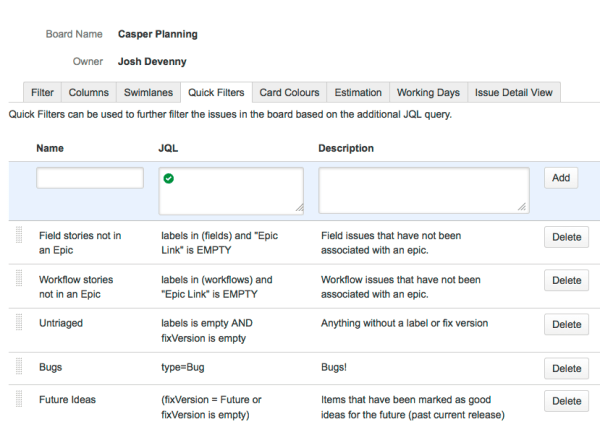
Navigation: Click Board > Configure > Quick Filters tab
- Provide a ‘Name’ (will be a button name automatically).
- Supply a ‘JQL’ statement (you can use Jira auto-complete mechanism).
- Enter a ‘Description’, which will be stored only in the Quick filters tab, so you can quickly figure out what the filter does.
- Click the ‘Add’ button to see your newly created filter.
Creating Swimlanes for Scrum Board
Swimlanes are a separate collection of issues in Active Sprints, Scrum Boards, or Kanban Boards. Swimlanes help categorize and distinguish tasks from other workstreams, users, or application areas. For ease of visibility, these are displayed horizontally, separately from the mainboard.
Separating a determined collection of issues, assets, stories, epics, etc into a swimlane ensures that your issues are not getting lost within the overall project. This can be specifically helpful when you’re looking to separate out issues assigned to you, separate stories from issues, or keep epics separate from each other.
Swimlanes categories
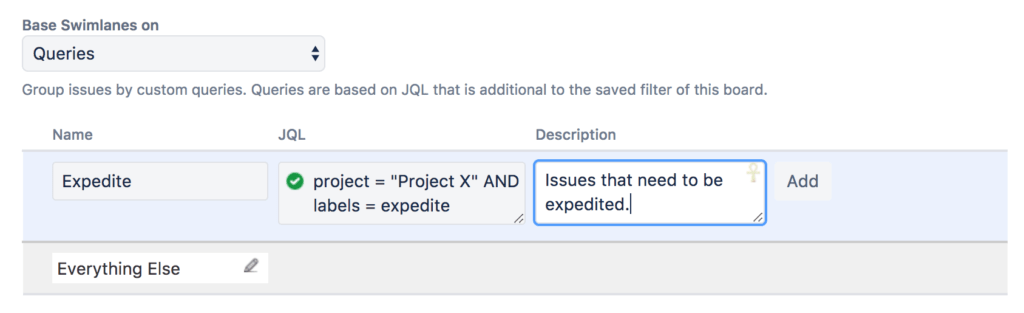
- Queries – One JQL query per swimlane, by default, two swimlanes – Expedite & Everything Else
- Stories
- Assignees – One assignee per swimlane, with unassigned issues appearing either above or below the swimlanes.
- Epics – One epic per swimlane with issues not belonging to an epic is grouped below the swimlanes.
- Projects – One project for each swimlane, with issues displayed below their respective projects.
- No Swimlanes – No horizontal categorization of issues in the Active sprints of a Scrum board, or on a Kanban board.

Swimlanes from Scrum Board
- Go to your board, then select Board dropdown and click Configure.
- Click the Swimlanes option.
- In the Base Swimlanes menu, select either Queries, Stories, Assignees, Epics, Projects, or No Swimlanes, as described above.
Example JQL queries for your swimlanes
Show all issues that belong to a particular component, e.g. ‘Expedited’
project = “PRODAPP” AND component = “Expedited”
A common use case for swimlanes is the expedite lane. Say in a given development cycle, due to a cross-project dependency, you suddenly need to ensure that a particular issue gets done before all others. In Jira Software, you can label the issue “Expedite” and create a swimlane that captures all issues with said label.
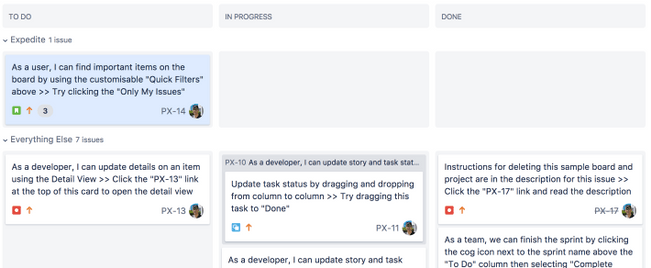
Your final result would look like this, ensuring that your team’s attention will be given to the first row before all else.
Creating Card Colors & Layout for Scrum Board
You can configure the JIRA Card color based on “Issue Types”, “Priorities”, “Assignees”, “Queries” or “None”.
Let’s take an example of configuring the Issue Card color based Queries using due date
- The overdue issue, the card will be RED
- Near the due issue, the card will be YELLOW
- Far the due issue, the card will be CYAN
- No due date issue, the card will be BLACK
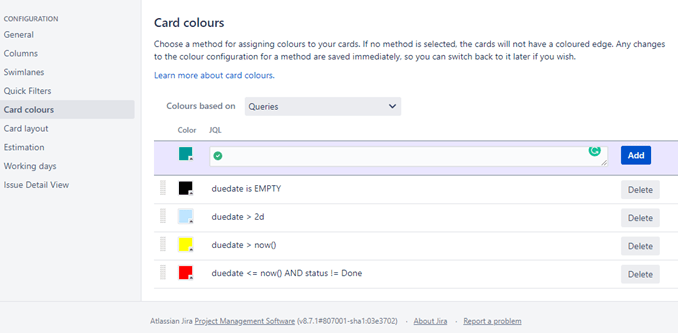
- In the JIRA board, choose Board | Configure menu
- Choose “Card colors” on the Configure page
- Select the Queries option in the “Colours based on” on the page
- Create follow JQL
- BLACK: the due date is EMPTY
- CYAN: due date > 2d ( it means that if the due is 2 days far from now, the issue will be in CYAN color)
- YELLOW: duedate > now()
- RED: duedate <= now() AND status != Done
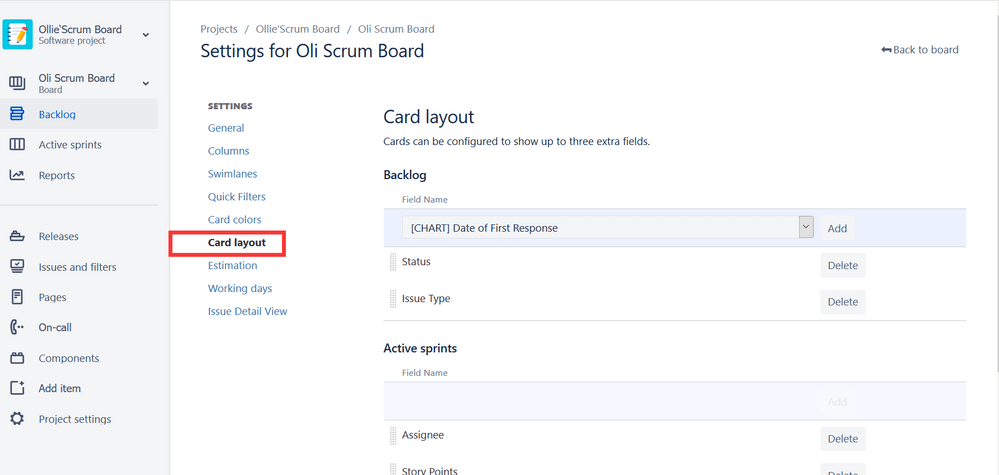
You can configure the JIRA Card layout based on fields set by the JIRA admin.
Configure the Issue Card layout based on Project, Due Date & Status
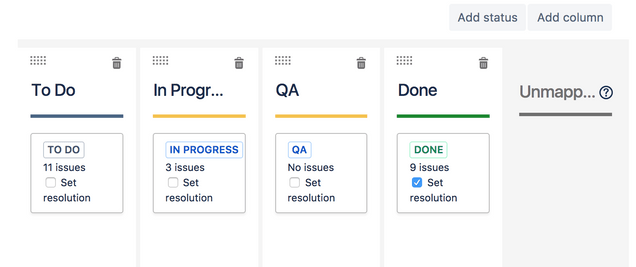
Scrum Board Columns
Scrum board columns are powerful customization to make a positive impact on your team’s processes. When configuring columns with a simplified workflow, adjusting your workflows is as easy as adding statuses/columns and dragging and dropping to reorder items in the column configuration UI.
Adding a Status
- Select Agile > Manage Boards from the top navigation bar, then click the Configure link corresponding to the board of interest.
- Click the Columns tab.
- Click the Add Status button at the right of the page.
There are three standard statuses JIRA provides i.e. “To Do”, “In Progress” & “Done”.Need a new column for “QA or Testing” then add a column and a corresponding status.
Deleting a Status
If your board is using Simplified Workflow:
- Select Agile > Manage Boards from the top navigation bar, then click the Configure link corresponding to the board of interest.
- Click the Columns tab.
- Drag the status to the Unmapped Statuses column.
- Click the delete icon (trash can) for the status you wish to remove.
Recommended Reading
- Scrum Board – Create & Customize for Scrum Team
- Kanban Board – Create & Customize for Kanban Team
- JQL functions – Advanced searching in JIRA
- JIRA Structure – Create & Manage Epics and Stories
- Bulk Jira Issue creation using CSV Template
- JIRA Reports use in tracking Agile Projects
- Issue Analysis Reports use in Agile Projects
- Sprint ID for an Active or Closed Sprint
- Text Field search using advanced search in JIRA