 A clear JIRA structure helps Agile teams organize large goals into manageable work, improve sprint planning, and track delivery with less confusion. A structure can contain issues, folders, and other items. There is no limit on the hierarchy depth, and you can bring together all types of issues from different projects.
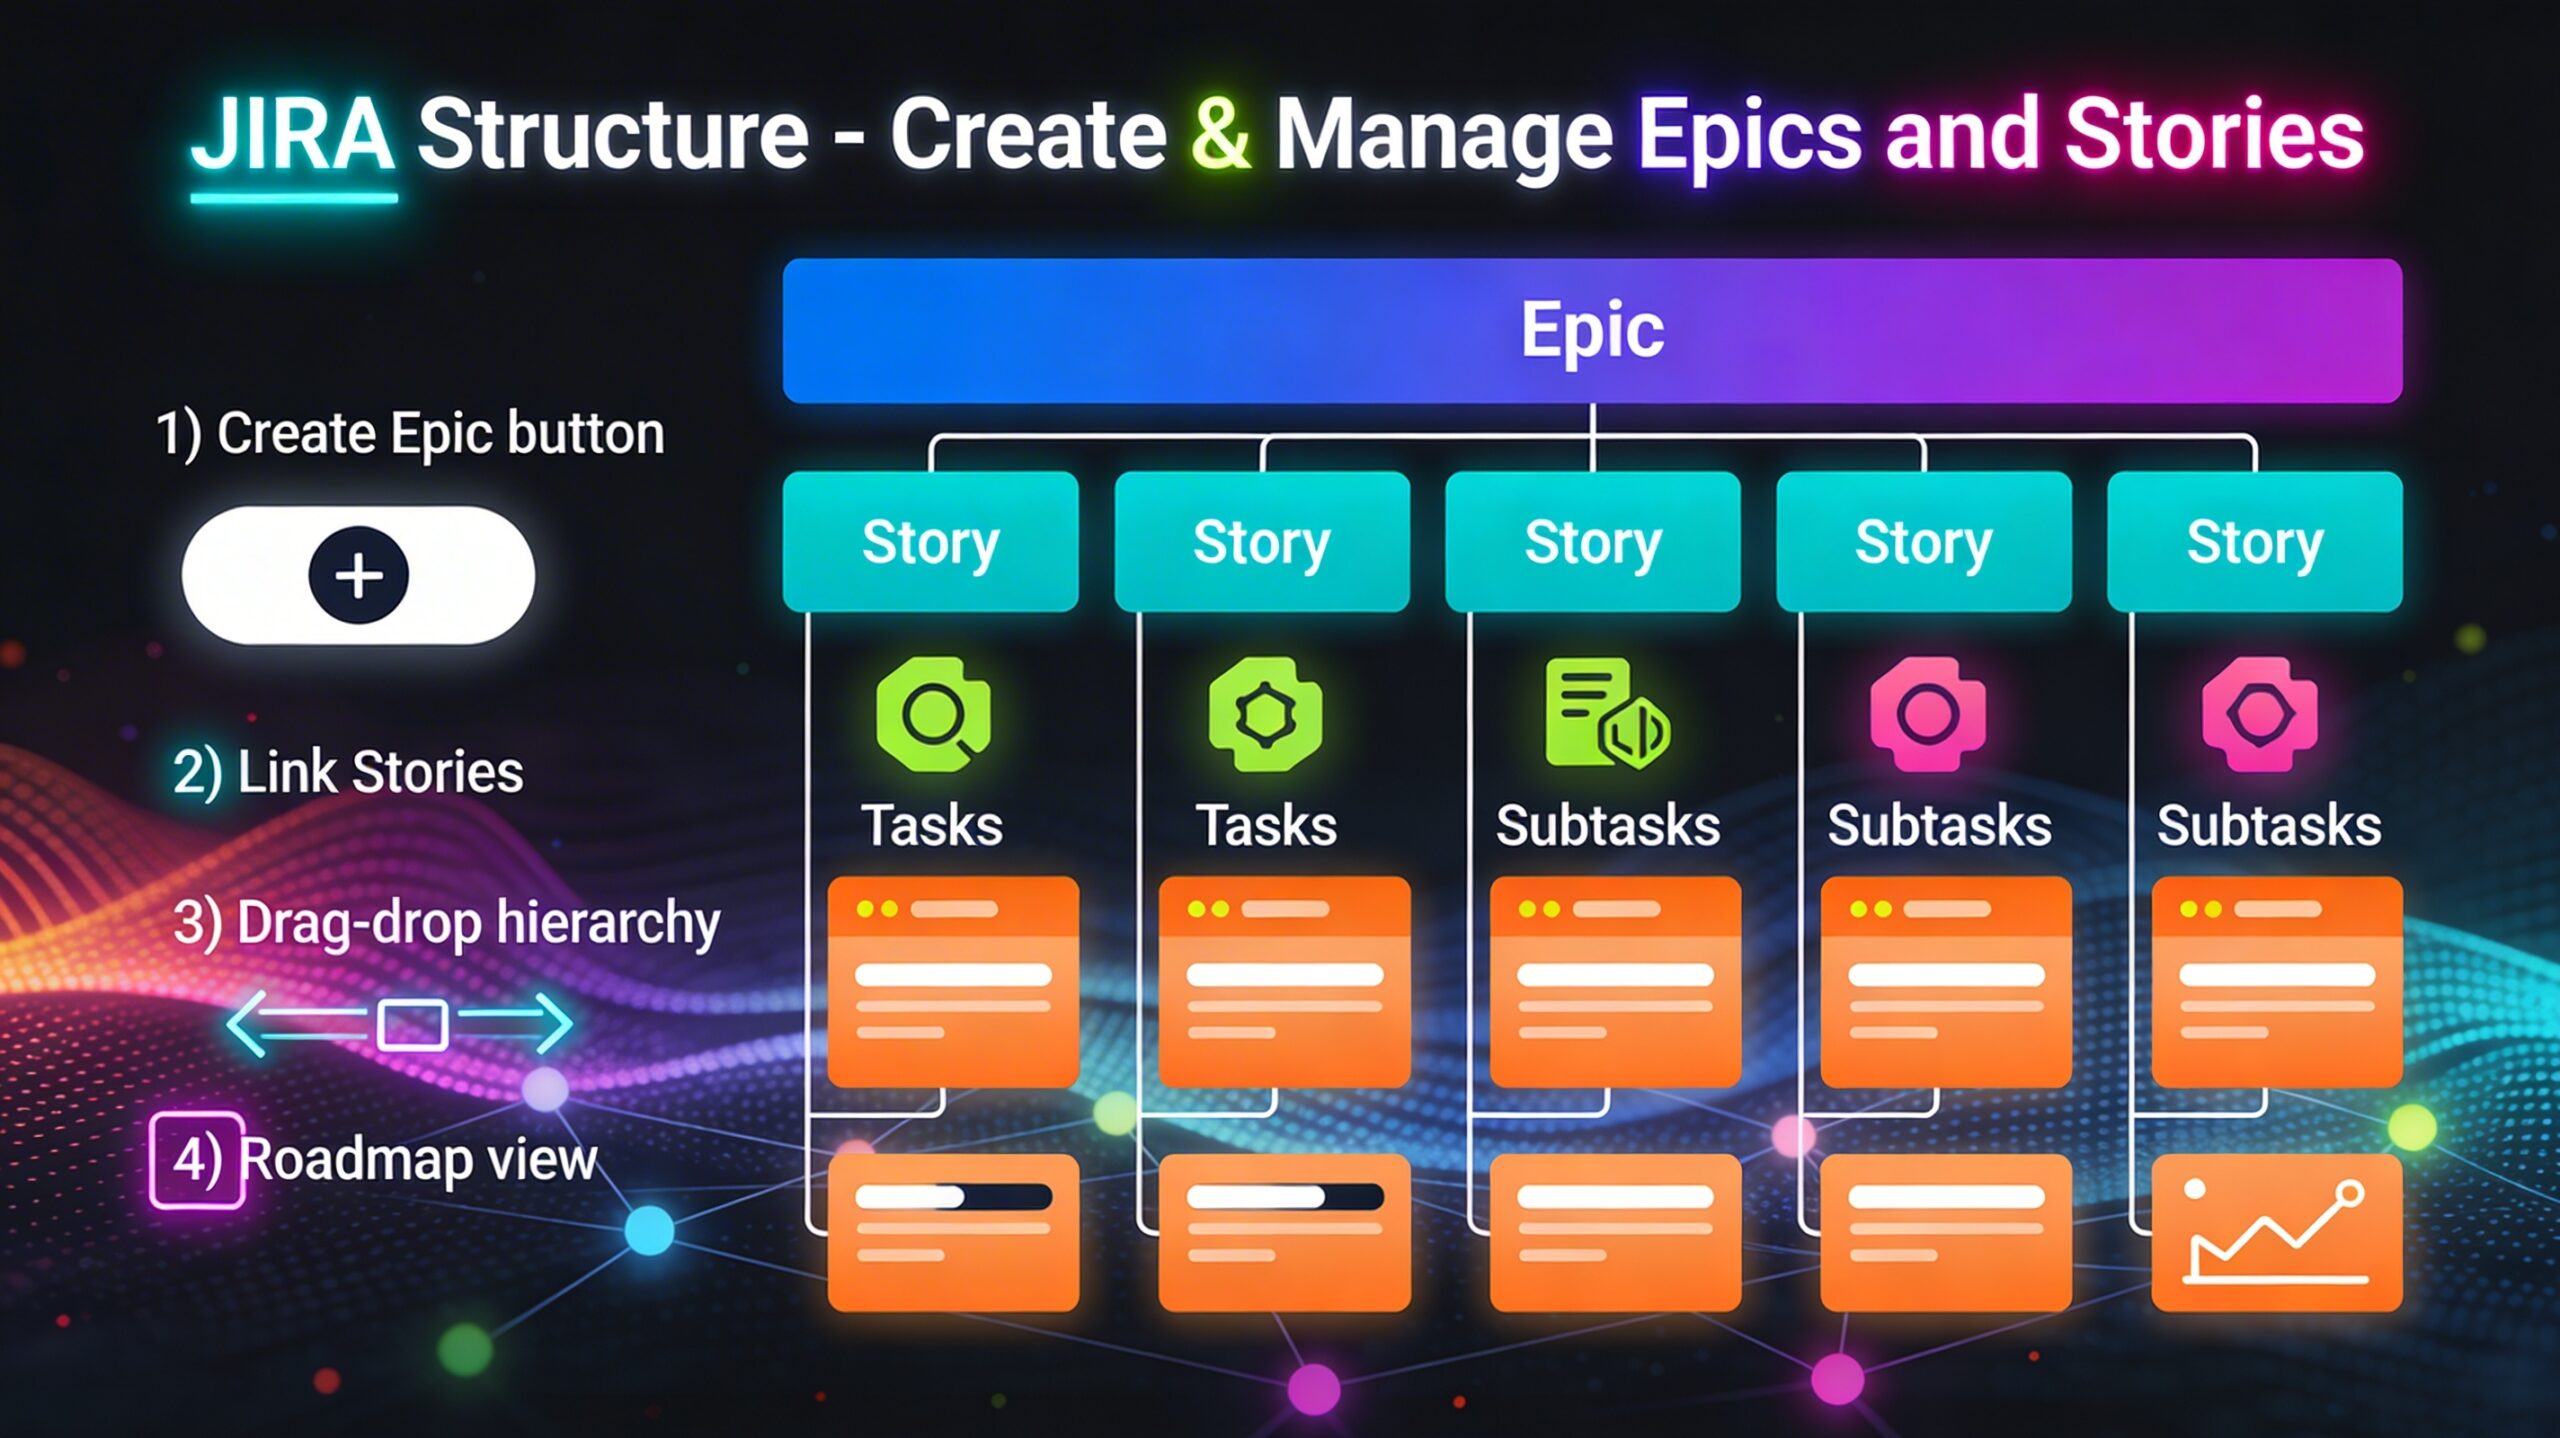
- Epics: These are large bodies of work that can be broken down into smaller tasks or user stories. They represent substantial features or initiatives that often span multiple sprints.
- Stories: Also known as user stories are smaller units of work that describe specific functionality from an end user’s perspective. They are manageable within a single sprint.
| Element | Purpose | Best practice |
|---|---|---|
| Epic | Large feature or initiative. | Keep it outcome-based and broad. |
| Story | User-centered requirement tied to value delivery. | Write it small enough for a sprint. |
| Task/Sub-task | Implementation detail or supporting work. | Use only when extra execution detail is needed. |
JIRA Structure Benefits
- Unlimited Hierarchy – Issue hierarchy may have any depth (sub-issues, sub-sub-issues, and so on), and contain issues from multiple projects and of any issue type.
- Big Picture – A structure may include important tasks and milestones from all projects and provide an overview of the progress for the management — in JIRA or in Excel.
- Templates – You can save time and effort by cloning a pre-populated template structure instead of creating all the issues by hand.
- Organization – When issues are collected into meaningful structures, you can quickly browse them and see the context of each issue.
- Total Progress and Time – Track total time spent, total estimation, or overall progress — Structure aggregates this information upwards through the hierarchy.
- Visualize – Get a single view of already existing hierarchical relationships, represented as issue links, sub-tasks or Agile Epic-Story links.
Creating JIRA Structure
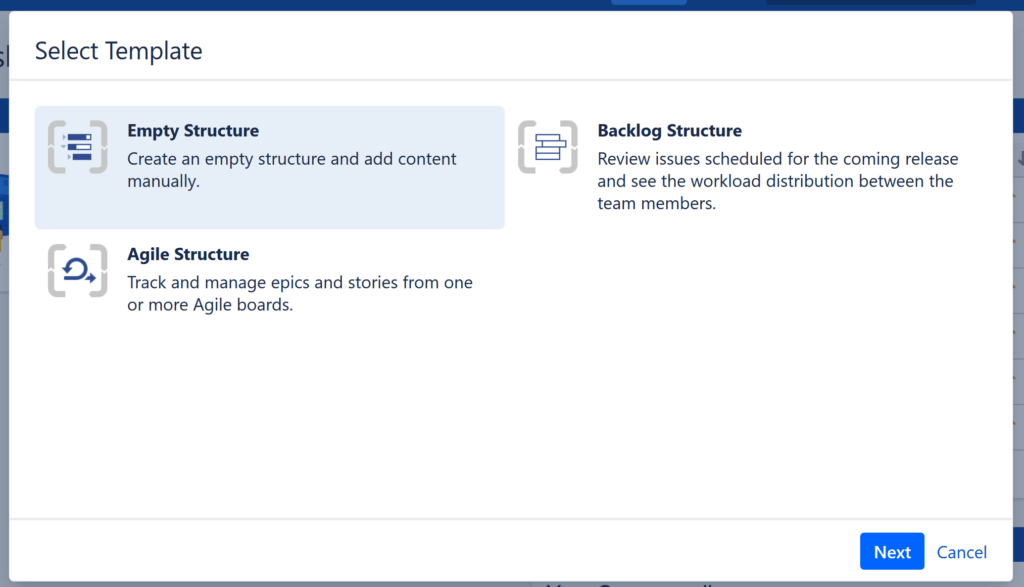
To create a new structure, select Structure – Create Structure in the top menu or click the Create Structure button on the Manage Structures page. You have the option of using a template or starting with an empty structure.

Copying JIRA Structure
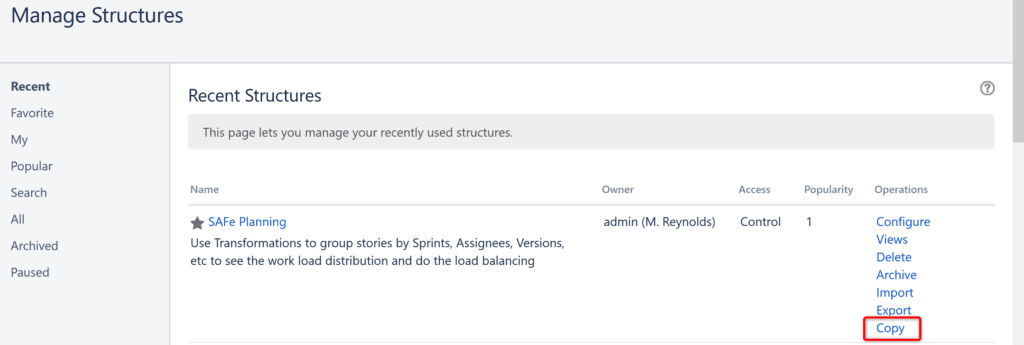
With the Copy action, you can create a full copy of a structure, and, optionally, clone every issue in the structure. To create a copy of a structure, open the Manage Structures page using the top navigation Structure menu. Find the structure you’d like to copy and click the Copy link in the Operations column.
Select the following options for copying the structure:
-
- Choose whether or not to include Quick Transformation and/or Notes column data.
- Choose how to handle generators and generated content, if the structure has any:
- Copy generators to the resulting structure – the new structure will contain copies of the generators from the original structure, which will generate the same content. This is the default.
- Replace all generators with the generated content – the new structure will contain only the generated content (issues, folders, etc.) and not the generators themselves (so the content will not automatically update with Jira changes).
- Do not copy generators – the new structure will contain only the non-automated content from the original structure. The generators and generated parts will not be copied.
- Choose if you’d like to copy synchronizers, if the structure has any. If you don’t see a Copy Synchronizers option, either the structure does not have any synchronizers or you do not have permission to create synchronizers. See Copying Synchronizers for more details.
- Choose if you’d like to clone issues If yes, enter the additional parameters for the cloning process.
Once you’ve made your selections, press Copy Structure or Start Cloning.
Using JIRA Structure
The structure toolbar shows buttons for the most frequent actions. When you have two panels open, the actions apply to the currently focused panel, which is indicated by a blue light at the top. The controls at the top of each panel let you specify what you’d like to see in that panel.
Automation is a powerful feature that lets you create dynamic structures. Unlike a manually created structure, a dynamic structure can update itself when there are changes in Jira. You can make parts of your manually created structure dynamic — for example, automatically placing all issues that match a query under a manually added folder.
Automation works through generators — special meta-items that are also located in the structure. You make a structure dynamic by adding and configuring generators. Normally, generators are not shown — you need to switch on the Automation button to be able to see and configure generators. Click the Automation button in the Structure toolbar. This will open the Automation Editing Mode.
Generator Types
There are five types of generators — five things you can do with a dynamic structure:
-
- Insert issues or other structures into your structure.
- Remove non-matching items from the structure.
- Sort adjacent items by field value.
- Place items into groups, based on field value.
- Include other items that are linked to items already in the structure.
Adding Generators
To add a generator, first select its parent item — the generator will affect only the part of the structure under that item. Then, click “+” part of the Automation button.
Changing Generators
Double-click the generator or use the Edit button on the toolbar to edit its configuration. You can also move generators to other positions in the structure or remove them.
About Transformations
You can also apply most generators to an already existing structure or even a search result. This is called transformation — you get a transformed, dynamic structure, while the original structure is not changed. Current transformations can be shown and changed using the Transformations panel.
Insert EPIC

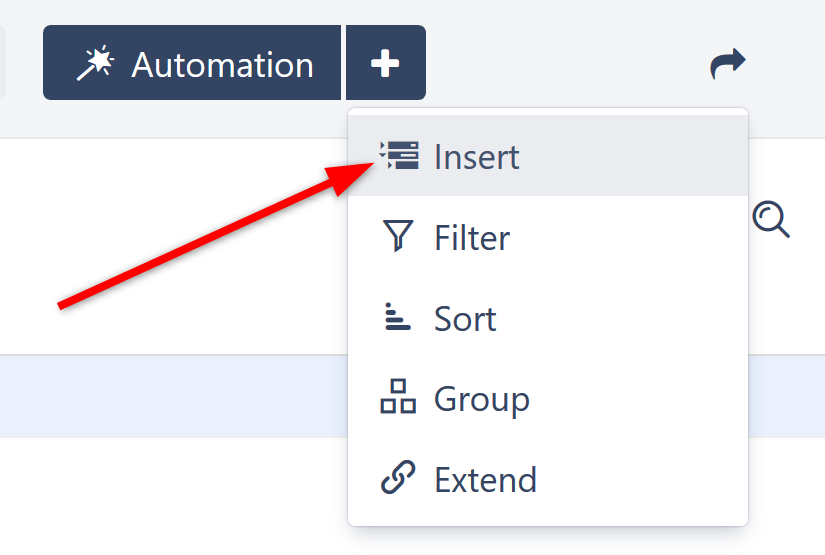
Once Automation Editing Mode is on, you’ll see a new ‘+‘ icon next to the Automation button. Click this and select Insert. You can import items from an Agile board or existing structure, or you can use a JQL query or text search.
Once you click Apply, the Insert generator will pull all issues that match your query into your new structure. In this case, they will add the Epics from our specified project.
Extend with Stories
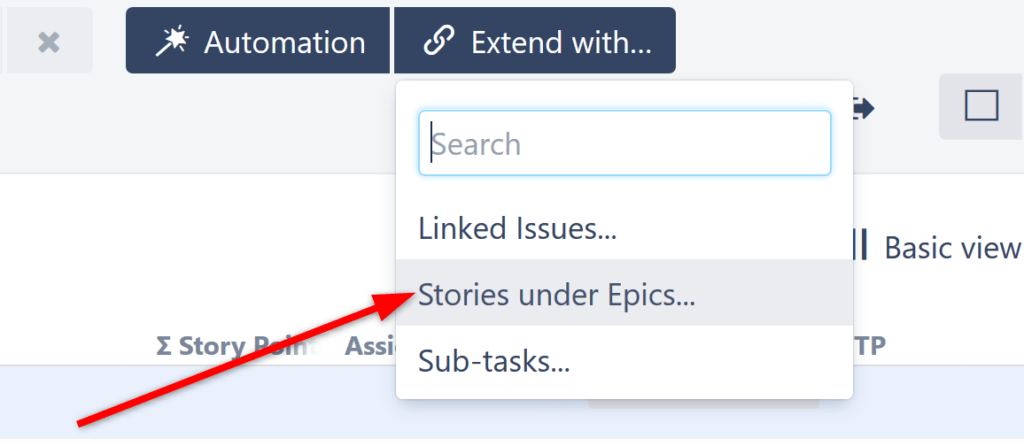
Now it’s time to extend our results to include Stories and Sub-tasks. To do this, make sure the top line of your structure, containing the structure’s name, is still highlighted (this makes sure we are applying the generator to the entire structure) and click the Add Generator button (+) again. This time select Extend. In the “Extend with…” menu, select Stories under Epics.
The Extend generator gives you the option to “Allow changes via Structure.” When selected, moving a story from one epic to another within Structure will also move the story within Jira. This option is selected by default.
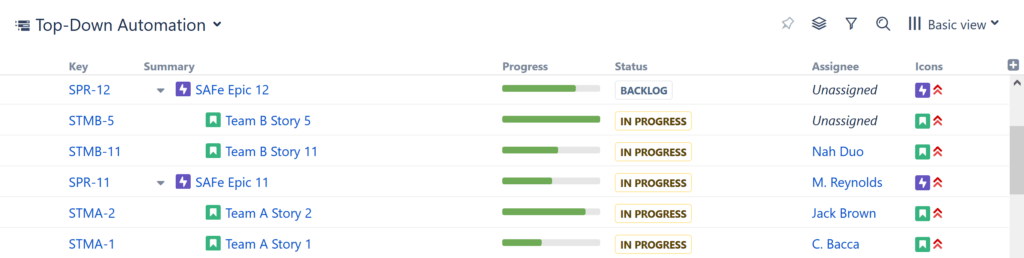
Click Apply. Some (maybe all) of your epics should now have a small arrow next to their Summary. Click the arrow to expand to the next level in the hierarchy – in this case, that’s the Stories under each Epic.
Extend with Sub-tasks
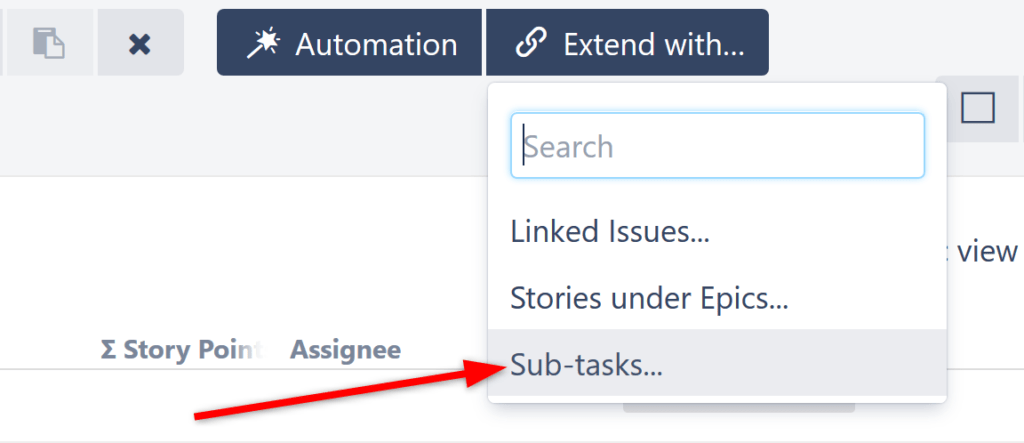
Finally, we’ll add Sub-tasks under Issues. Once again, make sure the top line of your structure is still selected (highlighted), click the ‘+’ next to the Automation button, and select Extend. This time, select Sub-tasks.
You can choose to only add specific types of sub-tasks, or choose All available sub-task types. You can also select how many levels to include, as well as whether or not you want to allow changes within the Structure. Once you’ve made your choices, click Apply.
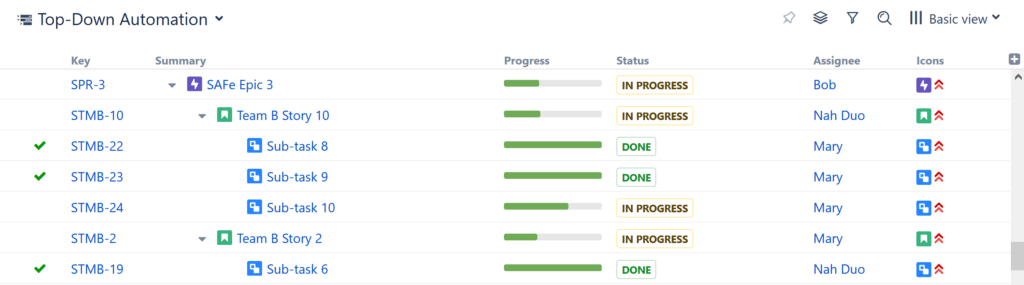
Your issues should now appear in a hierarchy, based on the Automation rules we selected. If you want to re-arrange items or move a sub-task from one story to another (or copy it from one to another), you can do so from within your structure. (We’ll cover that in Working with Structure.)
Best practices
- Define Epics as large outcomes or features, not as every single work item.
- Keep each Epic focused on one business goal, customer journey, or release theme.
- Break big Epics into smaller Stories that are clear enough for sprint planning and delivery.
- Write Stories around user value, not just technical activity, so the team understands the purpose of the work.
- Link every relevant Story to the correct Epic to maintain traceability and clean reporting.
- Avoid creating too many Epics, because backlog clutter makes prioritization and roadmap views harder to manage.
- Prioritize Epics and Stories based on business value, dependencies, and delivery impact.
- Define acceptance criteria and a clear Definition of Done before work starts.
- Review and refine Epics regularly so they do not become open-ended containers.
- Close completed Epics promptly to keep dashboards and reports accurate.
- Use Tasks and Sub-tasks only for execution detail, not as substitutes for Stories.
- Use backlog, board, and roadmap views to monitor how Stories roll up into Epic progress.
- Add automation where useful, such as updating Epic status when linked work changes state.
- Keep the backlog clean by removing duplicates, outdated items, and vague placeholders.
- Align Epics with product goals, OKRs, or quarterly objectives so Jira reflects real priorities.
Conclusion
Effectively managing Epics and Stories is crucial for successful Agile project execution. JIRA’s Structure feature, with its visual hierarchy, drag-and-drop functionality, and customization options, provides a powerful solution for organizing and tracking Epics and Stories. By incorporating Structure into your JIRA workflow, you enhance collaboration, visibility, and overall project efficiency.
Recommended Reading
-
- Scrum Board – Create & Customize for Scrum Team
- Kanban Board – Create & Customize for Kanban Team
- Scrum Board – Tips and Tricks for JIRA
- JQL functions – Advanced searching in JIRA
- Bulk Jira Issue creation using CSV Template
- JIRA Reports use in tracking Agile Projects
- Issue Analysis Reports use in Agile Projects
- Sprint ID for an Active or Closed Sprint
- Text Field search using advanced search in JIRA