JIRA’s Time Tracking feature allows teams to record their time on different tasks and projects. This information can be used to measure productivity, monitor progress, and make informed decisions.
Enable Time Tracking permissions: Go to the JIRA administration section and select “Issues,” then “Permission schemes” then “Permissions” then “Time Tracking.”
Configure Time Tracking: Go to the JIRA administration section and select “Issues”. In The sidebar, under ISSUE FEATURES, select Time Tracking. Click Edit global settings. Teams can configure the time tracking settings to their liking, including the time format and the number of decimal places used.
| Field | Description |
| Working hours per day | The number of hours in your working day (decimal values are accepted). |
| Working days per week | The number of days in a working week (decimal values are accepted). |
| Time display format | Select the Pretty, Days, or Hours format that’ll appear on an issue’s Time Spent field. |
| Default unit | Select the unit (Minute, Hour, Day, or Week) that will be applied to logged time if the user doesn’t specify one. |
| Copying of comments to the work description | When enabled, comments added when transitioning an issue will be copied to the Work Description. User time log entries will only be visible to members of the project role or group selected. Disabling this option will make user time log entries visible to anyone by default. |
Here’s how to use this feature in JIRA, along with some sample data and examples:
Create a JIRA ticket: To track time in JIRA, teams must first create a JIRA ticket for the task they are working on. This ticket will serve as a record of the time spent on the task.
Log work: To log work in JIRA, teams simply need to open the JIRA ticket and click the “Log Work” button. Teams can then enter the number of hours they worked on the task and add a brief description of the work performed.
Update time tracking: Teams can update the time tracking data at any time by clicking the “Log Work” button again and adjusting the number of hours and description of the work performed.
Generate reports: Teams can use the time-tracking data in JIRA to create reports and dashboards that provide insights into their productivity and progress. To create a report, teams can go to the JIRA reporting section and select the time-tracking data they want to analyze. Teams can then choose the type of graph or report they want to create and customize it as needed.
Reports and dashboards: Teams can use the time-tracking data in JIRA to create reports and dashboards that provide insights into their productivity and progress. For example, teams can create a report that shows the total time spent on a particular project or task, and another report that shows the average time spent on tasks over a given period. Teams can also create a dashboard that provides an overview of their time-tracking data, including a graph that shows the total time spent over time.
Sample data: Here’s sample data in JIRA, including the date, time, and description of the work performed:
| Date | Time | Description |
| 02/01/2023 | 4 hours | Completed user interface design |
| 02/02/2023 | 3 hours | Fixed database connection issue |
| 02/03/2023 | 2 hours | Improved search functionality |
Time Tracking Fields
These four time-tracking fields are primarily used in software development, and here’s what they record:
- Original Estimate: The original time set to complete the issue, project, or task.
- Estimated Time Remaining: The amount of time that still needs to be tracked as part of the original estimate.
- Time Spent: The time already spent working on the issue.
- Accuracy: The original estimate compared to the current estimate. In other words, this can be described as the difference between the estimate and the time spent.
To better describe it, add the Time Spent and the estimated time remaining.
Note: For sub-tasks, the ∑ symbol on the right side of each column indicates the aggregate time for each parent Jira issue. Essentially, it is the sum of issue metrics and sub-tasks metrics. The last line of the report indicates the total time tracking values for the whole version.
Logging work on an issue
To log work when viewing an issue:
- Navigate to the issue and view its details.
- Select More > Log Work.
- The Log Work dialog box is displayed.
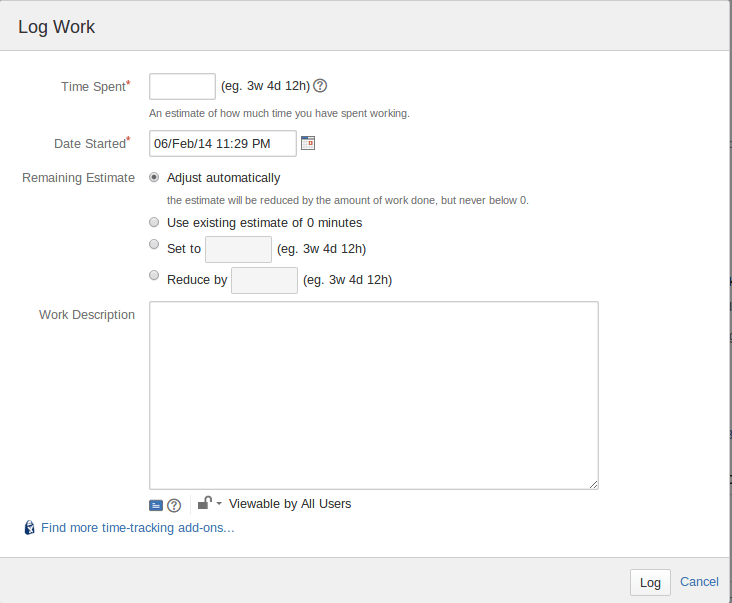
- In the Time Spent field, enter the amount of time to be logged. Use ‘w’, ‘d’, ‘h’, and ‘m’ to specify weeks, days, hours, or minutes. For example, to log two hours of work, type ‘2h’.
 If you type a number without specifying a time unit (e.g. if you type ‘2’ instead of ‘2h’), the default time unit as specified by your JIRA administrator will apply.
 - In the Date Started field, click the calendar icon to select the date/time when you started work. The calendar popup will be displayed, where you can:
- use the month scroll back (‘<‘) or forward (‘>’) icons to choose a different month.
- use the year scroll back (‘<<‘) or forward (‘>>’) icons to choose a different year. If you click and hold one of these scroll icons, a dropdown menu appears, allowing you to select a month or year from the list of options provided.
- click the hour to increase it (or <Shift> click to decrease it).
- click the minute to increase it (or <Shift> click to decrease it).
- click ‘am’ / ‘pm’ to toggle between them.
- The Remaining Estimate field affects the value of the issue’s Remaining Estimate value. Select one of the following:
- ‘Adjust Automatically‘ — Select this if you want to automatically subtract your Time Spent from the issue’s current Remaining Estimate value.
- ‘Leave Estimate Unset‘ — Select this if you do not want to specify any time estimates for the issue. This option is only displayed if no time estimates have been specified.
- ‘Use an existing estimate of …‘ — Select this if you do not want to change the issue’s Remaining Estimate value. This option is displayed if a time estimate has been specified.
- ‘Set to …‘ — Select this if you want to manually set the issue’s Remaining Estimate value to the amount specified. If you select this option, enter your new estimate into the blank field below. Use ‘w’, ‘d’, ‘h’, and ‘m’ to specify weeks, days, hours, or minutes. For example, to specify ‘thirty minutes’, type ’30m’.
- ‘Reduce by …‘ — Select this if you want to manually reduce the issue’s Remaining Estimate value by the amount specified. If you select this option, enter your new estimate into the blank field below. Use ‘w’, ‘d’, ‘h’, and ‘m’ to specify weeks, days, hours or minutes. For example, to specify ‘thirty minutes’, type ’30m’.
- In the Work Description field, type a description or comment about the work you have done.
- Click the padlock icon to either set this work log to be viewable only by members of a particular project role or group, or you can allow all users to view it. For users to view a work log, they must have the Browse Project permission to view the issue and be a member of the project role or group selected in this step.
- Click Log at the bottom of the dialog to submit the form and close this window.
- the Time Spent that you just entered has been added to the issue’s total Time Spent field.
- the Remaining Estimate value that you just entered (or chose) matches the issue’s Remaining Estimate field.
Deleting a work log entry
- Navigate to the issue and view its details.
- Locate the Activity section and select the Work Log tab.
- Locate the work log entry you wish to delete.
- Click the Delete icon, located at the right of the work log entry.
- The Delete Worklog screen is displayed. The Adjust Estimate field affects the value of the issue’s Remaining Estimate. Select one of the following:
- ‘Auto Adjust’ — Select this if you want to automatically add the work log entry’s Time Spent value back to the issue’s current Remaining Estimate value.
- ‘Leave existing estimate of … ‘ — Select this if do not want to change the issue’s Remaining Estimate value.
- ‘Set estimated time remaining to …’ — Select this if you want to manually set the issue’s Remaining Estimate value to the amount specified. If you select this option, enter your new estimate into the blank field below. Use ‘w’, ‘d’, ‘h’ and ‘m’ to specify weeks, days, hours or minutes. For example, to specify ‘thirty minutes’, type ’30m’.
- ‘Increase estimated time remaining by …’ — Select this if you want to …
- Click Delete to confirm the deletion and return to the issue. Verify that:
- the issue’s Work Log tab no longer displays the work log entry that you just deleted.
- the issue’s History tab displays the Worklog Id (but not the description) of the deleted work log entry.
- the issue’s Time Spent field has been decreased by the value of the deleted work log entry’s Time Spent.
- the issue’s Remaining Estimate field has been adjusted according to your choice in Step 5 (above).
You can delete your own work log entries if you have been granted the Delete Own Work Logs permission. You can delete other people’s work log entries if you have been granted the Delete All Work Logs permission.
Advantages of JIRA time tracking
This feature offers several advantages for teams, including:
- Increased visibility: By logging time in JIRA, teams can track their progress and monitor the time spent on tasks and projects. This increased visibility helps teams understand how much time they are spending on different tasks and how they can improve their productivity.
- Improved planning and estimation: Teams can use the time-tracking data in JIRA to improve their planning and estimation. By understanding how much time they spend on different tasks, teams can create more accurate project timelines and better estimate the time required for future projects.
- Enhanced collaboration: JIRA’s time tracking feature allows multiple team members to log their time on the same task. This collaboration makes it easier for teams to understand how much time they are spending on tasks and how they can work together to complete projects.
- Better billing and invoicing: JIRA’s time tracking feature can help with billing and invoicing for teams that bill clients based on time spent. Teams can easily see the total time spent on a task or project and use this information to generate invoices.
- Better project management: Teams can use this data in JIRA to better manage their projects. By understanding the time spent on tasks, teams can identify any bottlenecks or delays and make adjustments to improve their workflow.
By following these steps, teams can easily set up and use the time tracking feature in JIRA to gain valuable insights into their productivity and progress.
Recommended Reading
- Scrum Board – Create & Customize for Scrum Team
- Kanban Board – Create & Customize for Kanban Team
- JQL functions – Advanced searching in JIRA
- JIRA Structure – Create & Manage Epics and Stories
- Bulk Jira Issue creation using CSV Template
- JIRA Reports use in tracking Agile Projects
- Issue Analysis Reports use in Agile Projects
- Sprint ID for an Active or Closed Sprint
- Text Field search using the advanced search in JIRA